PHG500D QuickStart

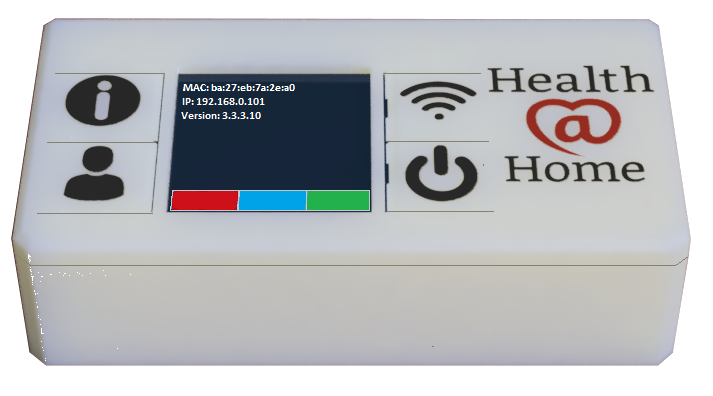
- Solid red indicates that the internet connection has been established
- Solid blue indicates that the boot configuration was downloaded successfully
- Solid green indicates that a connection has been established with Health@Home Exchange
Button Layout
Information Button (Top Left) – Cycles through information screens. The first press of the button make take a while to respond.
WPS Button (Top Right) – Allows the PHG to connect to a WiFi network that uses WPS.
User Button (Bottom Left) – Press once to display current user. Subsequent presses cycles through available patients to select a new user.
Power Button (Bottom Right) – Tap to reboot. Hold to shutdown. This button will not power on the PHG500D.
Establishing an Internet Connection
There are two methods to establish an internet connection for the PHG500D. If the local WiFi router supports WPS, press the WPS button on the router then the WPS button (upper-right) on the PHG500D to connect to local WiFi.
The other method to establish an internet connection requires a mobile device (Android or iOS). This procedure is described below. Note that the PHG500D requires the use of a 2.4 GHz WiFi network using channels 1 through 11, it will not support 5G or channels 12-14. Instructions for working with the Companion applications are included below.
URL: https://play.google.com/store/apps/details?id=com.lampreynetworks.lnihubassist
- Install the Companion application on an Android tablet or phone.
- Open the Companion App. Accept the prompt to enable location services for the Companion application.
- On startup the initial screen displayed is the ‘Discovery Screen’. This screen displays the PHG identifier, IP Address configuration status and managed state for any discovered Health@Home units.
- Search for the PHG sticker address. Any unconfigured PHG will display the text ‘SET WIFI’ under the IP Address column
- Touch the ‘SET WIFI’ text to have the Companion application attempt to configure the PHG500D. A new screen will appear which displays all local WiFi networks discovered by the PHG500D
- Select the desired network from the list and enter the WiFi password to establish an internet connection
URL: https://apps.apple.com/us/app/health-home-companion/id1534330636
- Install the Companion application on an iOS tablet or phone.
- Open the Companion App. Accept the prompt to enable location services for the Companion application.
- On startup the initial screen displayed is the ‘Discovery Screen’. This screen displays the PHG identifier, IP Address configuration status and managed state for any discovered Health@Home units.
- Search for the PHG sticker address. Any unconfigured PHG will display the text ‘SET WIFI’ under the IP Address column
- Touch the ‘SET WIFI’ text to have the Companion application attempt to configure the PHG500D.
- Enter the WiFi SSID and password to establish an internet connection
Taking a measurement
- Make the sensor device start advertising. A guide for each sensor supported by LNI can be found at https://ec2-3-93-60-20.compute-1.amazonaws.com/compatible-sensors
- Use the PHG Devices page in Exchange to search and pair with the sensor device. This step may be skipped if the sensor device has been added to the PHG’s auto-pair list.
- Take a measurement once the PHG500D has successfully connected to the device


A check indicates the successful upload of sensor data to Health@Home Exchange.
A prohibition sign indicates that the PHG was unable to upload sensor data successfully.